Showing posts with label gesso. Show all posts

Tuesday, April 20, 2010

If The Table Is Covered.....


.....it must mean art is happening!
After all the to-do about getting the studio cleaned, I discovered the very sad truth:
I cannot work when it is sterile and spotless. My creativity is shut off and since I lassoed that blasted muse and brought it back kicking and screaming, it was time to get going.
And I think by the photos above, it is obvious something is happening!
I have had, for a long time, a desire to work with some old drug store pharmacy labels and Rx's that were written when the dosage was scribed by the doctor. It really was a *recipe* for the medication being prescribed. So after purchasing a bunch (read that way too many!) I scanned them and printed them out onto tracing paper, along with some other anatomical things, then pulled some pieces from an old PDR and a medical dictionary.

This was the direction I was going, but decided the center of the canvas really needed a focal point and thus began a computer search for either a caduceus or staff of Asclepius.
(a short aside: the U.S. Army of 1902 is partially to blame for the current use of the caduceus as a medical emblem, when in reality, it is the staff of Asclepius that should be portrayed. The caduceus was the staff of Hermes, god of trade, money, trickster, and known to deliver death upon occasion. Asclepius was the half son of Apollo and was known for healing with his staff with the single serpent. Someone in the Army didn't do their homework........)
Obviously Anne spent a little too much time doing research, but you know....I do get a bit, ummmm, anal about these things!
Moving on......I finally find what I want for the center, and all the paper pieces I had laid on for consideration go off and the staff is carefully cut out and placed over a base of heavy gel medium. I applied it with a disposable icing bag, which was perfect to keep the gel within the guidelines and not have too much going everywhere.

This is how the over all piece looked after cleaning the edges of the gel......


And a close up to show the texture from the background gesso and the depth of the staff.
And yes, all good serpents of the healing variety have their encounters with the beauty salon...

.....or in other words, when I am in a hurry, I have no hesitation about shoving things under the hair dryer on low heat. It speeds along the drying without affecting the gel's stability. (never do this with a crackling medium, it only works for gels.)
So now, I have a central focus, lot of pieces and spent the day figuring things out.
And that is where I sign off this post.
More photos tomorrow, be they good or bad! Occasionally I get in too much of a hurry, things get glued on that don't really work and then I have to sit and look, or go mow grass and let my grey matter wander.
While this is not everyone's cup of tea, y'all that know me know my love of all things anatomical and medical, thus, my creation......
Stay tuned; more body parts to come!  ;-)

Pax.

Friday, May 15, 2009

Gilding--or--"Mommy, why is that lady's behind gold and glittery???"

Yesterday's day away from the blog was, in a way, GOOD, as I got more done and some photos shot. The first leafing I put on was the silver, as it was on the interior edge of the wood, and that was the smallest, soooooo, a wise place to start!
This shows one side of the wood with the leaf applied and then a coat of fluid acrylics and GAC 200, to antique it. I did not want it excessively bright. The second photo also shows the silver, but you can see there is adifference in appearence.
This is due to the texture of the underlying wood and the many coats of gesso, that build up the texture. In traditional gilding, the gesso base is made as smooth as possible to allow the leaf to look like real metal, or in the case of antique gilding, real gold. I like what happened with the rougher undersurface; I think there is a particular character to it and will work well with the finished piece.
Then I got brave and began the gold colored leaf. This may be psychological, but this leaf seems much softer and harder to work with. I should add here that I did NOT buy the usual gilders medium to apply this with. It's too slow to dry and gets to be a big mess. I chose to try the matte version of Collage Pauge and while your work time is shorter, it seems to do the job very well.

At this point you can see the red background and the very soft natural bristle brush I use to smooth the leaf out. You must--I repeat MUST--use an extremely light touch when smoothing the leaf with the brush. There is only so much you can do once it has hit the size/glue base. It is there. After it is set up, I use the brush to take off loose pieces and tiny areas I have had to backfill.
That is where the title of the post came from.....I discoverd that not only was the table covered with tiny bits of gold, but the floor, my shoes, the rug, the wastebasket and my chair. Which meant something else was probably covered too........ai yi yi......
This is how it looked after the last leaf application. There are rough spots, places where the red shows through but that will be okay. For my next step, I think the red should help to add to the overall composition.
I rarely show step by step process on these, and this is rather fun! I hope you are learning a bit from it, even if that is that you NEVER EVER want to try metal leaf!!! LOL!!!
Wait till you see the next part.....
Stay tuned!
P.S. One thing I did not place enough emphasis on is allowing proper drying time for the leaf to set up and then really cleaning the tidbits of unadhered leaf OFF the project. That's when your whole world begins to shine....because it is everywhere. It's a good idea to cover things with a disposable paper or plastic cloth. Saves time and sanity. ;)

Tuesday, May 12, 2009

Back to the box canvas and texture....

I know, I know....I bounce from one thing to another. Sorry--that's sort of the only way I get things done here. I don't have a lot of specific time for only one thing, and when I do, boy, is it wonderful! So before I lost my train of thought on this project, I got back to it today.
Some of the work was done previously, but needed retouching.

The small pieces of stamped tissue were applied with gel medium, but it dulled the inteference color, so I had to wait until it was completely dry and then reapply some of the paint with the starry stamp. It came up nicely; actually, it shows more here than when you are looking straight on at it.
The next issue was the back of the canvas, and granted, I am asking you to with hold judgement until I can get a few more steps along.......

.....it does have the look of something Chinese with the choice of colors but trust me, not even close! The inner part was what I was happy with; one coat of acrylic in a rough wash style, and then two coats of two different fluid acrylics to give it a depth and glow. The heavy coats of gesso let me paint and rub and lift, getting a very aged look.
The odd thing was I had a difficult time getting this red to photograph. I tinkered with it in my photo program, and it still is not the exact color. It really is a burn-your-eyes-out red orange, more on the red end of things.
Anyway, just like a soap opera, stay tuned for more!
Today is PT and the check up with the surgeon, so it definitely is a *No Art* day, unless it becomes an *Art Supply* day!
Hmmmmmmm......... ;)
Now go do something creative!

P.S. As an idea of what visual texture alone can do with the eye/mind connection, go visit Linda at Marbled Musings for her textile work........it is all a matter of fooling the eye, to some extent, and processes we employ to do it.

Tuesday, May 5, 2009

Texturally Speaking......

As promised, I got some adequate photos of the piece I am currently working on. Okay, this probably does not knock you over with tons of appeal....give it time! Surprisingly, the texture shows fairly well, though naturally if you had the canvas in your hand, it would show a lot more variation in color.
This was a canvas I poured the gesso on then took a palette knife and pushed it about. There were already a couple of layers on there, so there was a good base for it to stick to and begin to dry and form.
I wanted a look of a stuccoed wall, and the color something in the range of old parchment or papyrus. The yellow came up nicely, then I added some soft black, some brown (umber I think) and then took one of the Golden fluids, an interference red, and rubber stamped the piece. The beauty of the interference color is straight on it shows little, buuuuuuuuuut.....
......tilt the piece to the side and there is this abundance of shimmer. It's like you have turned on the lights on a Christmas tree! There is something about the quality of the paint that allows it to be gaudy and subtle at the same time, and I love using these! It is NOT copper, though in the pic it appears that way. The base color of the canvas still shines through; all the shading, the lights and darks, the bumps, lines and crevices. It almost floats on top of the other texture visually.
This is just the beginning; as I get more done on this, I will post it. This is going to be a complex piece, so there may be *jumps* in the photo progress, because I tend to get working and don't want to quit for fear of losing the train of thought.
There is also the issue of Anne heading to the cellar and the camera being upstairs, and not wanting to walk the stairs again..... ;) At least this time it's not laziness!
Yes, I am one of those people who gets excited over lumpy, bumpy, dirty looking canvas.
Yes, I really do have a life!
And this is part of it!
So what odd technique do you use that other people look at you like you've lost your mind when you express great happiness over? Come on---fess up!
And have a good creative, totally satisfying art day!

Saturday, May 2, 2009

A Little Art Nourishment


(Photo copyright Anne Huskey Lockard, 2008, all rights reserved)
Today I am heading for the studio. I need to be fed with creativity, which I can't suck out of a feeder like the little guy pictured above. When I finish here, I am shutting the computer down and plan on doing things to refresh and refill my art-well and heal me creatively. This week has worn me down to a nub and on orders from my DH (can you believe this? I'm paying attention!) I am staying in and resting. I have to admit I am so tired I can barely go today, surprisingly have a moderate pain level I've not had, so the cellar and paint are in my future.
I am working on a background I want to look like aged parchment or some sort of stone---color wise. It is slow building up the layers on the canvas, but the time I took to texture the gesso is paying off. All the little nooks and crannies catching bits of color, allowing the gradual additions to hold, going toward a final patina of age and wear and exposure to the elements. I will also be trying to build a paper form with layers of paper and gel medium, and then apply that to the canvas. I am hoping (fingers crossed double!) that it works. It is in my head and I need to try and get it OUT and see how to make the idea a reality.
This afternoon is reserved for reading on the sofa, the big book on Einstein's life, which is both heavy to hold and a little heavy reading, unless you have better math/science skills than I do. However, it is a fascinating portrait of the man and I enjoy savoring it bit by bit. He was, at least in attitude, an artist!
This is a good day for everyone to give in to their muses and let them lead you astray. Follow them and you should have a really great day! I plan to! :)

Monday, April 6, 2009

Waxworks

(Photo By Anne M Huskey-Lockard, copyright 2009, all rights reserved.)
As long as I am dealing with different types of collage I do, I thought I would post one of my favorites. It is a very small piece, 4"x5" and is put together with beeswax. There is no paint in this piece; the color is built up through layers of wax, paper and sheer nonwoven fabric. The pink and cream floral is the same as is used in some of the box canvas pieces.
I had put this together from remnants from a trip to New Orleans, thus the scrap of House of Blues tissue paper and the little label. On the streets of the Quarter, if you're brave enough to pick things up, you may find an interesting bottle cap. (usually though, all alcohol is put into plastic *Go-Cups*, which do little harm in spur of the moment disagreements....) I had some quality printed tissue left from tags I had made for work that was in a small folk art gallery there, so that went in, a lovely bleached leaf skeleton, along with a silver plated sacred heart milagro, and of course pattern tissue, due to the amount I sew---or used to sew for myself.
This is a warm, friendly little piece and taught me a lot about texture, as the wax cools quickly, and the canvas soon builds up a nice surface, though you have to tilt it to the side to really appreciate it. That textural aspect is put in the box canvas pieces through the use of gesso.
Hot beeswax is not for everyone. While it smells pleasant, it does SMELL after a while and really should be worked with in a well ventilated area with a fire extinguisher close at hand. Things can flash quickly if you lose your train of thought.
I sealed this with a floor varnish and it has held up quite well, considering it hangs right by the sidelight of my front door.
There is a part of me that would like to try a larger piece in this technique but still......I hesitate.
Small can say so much, and sometimes much more.
So what have you created of late??? Your turn!
P.S. If you look at the three-quarter shot in the second "Hand of Glory " post, you will see the texture that is approximately like what the beeswax leaves. This project was what gave me the idea for using the gesso as a texturing tool, to gently build a similar base to work on. Of course, with the wax, the texture is really the LAST thing and with the gesso it is the FIRST thing. Each yields interesting results and are both are worth trying to see what works for YOU.

Friday, April 3, 2009

Hand of Glory--Part Two

(Anne M. Huskey-Lockard, copyright 2009. All rights reserved.)
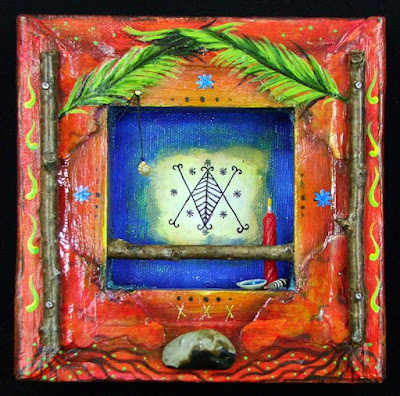
To continue with the story behind this canvas, the back is a direct reference to VoDou. The Veve--or symbol inside the canvas--is for Ayizan, the loa of the marketplace. She is the archetypal Mambo (priestess) and is tied with the natural world. My version of a small shrine is similar to what one sees wandering through the cemeteries in New Orleans.
Her symbol is the palm frond, she drinks no alcohol (thus the blue *water* in the small shell) and is syncretised with the Catholic St. Clare.
The pieces of wood and the roots are symbolic of her ties with the earth; the three small "X"s are a marking for a petitioner making a request. There are offerings in the little niche.
So what do the front and back have to do with each other?
The front is the somewhat acceptable form that Vodou eventually morphed into or hid behind, and the back is the remains of the true religion. So much was lost when slavery forced men and women to give up their ancestral practices, that even now, much is speculation. They had to hide their rites behind those of the Church, thus, very little true fact remains. But speculation, lack of those with knowledge being willing to discuss the subject for fear of reprisal has lead to the small amount of accurate information available today.
This honors those who lost their freedom, faith of their homeland and in many cases, their lives.
May their souls have been lifted to their ancestors on the soft wings of the moths and butterflies.
Again, comments and questions are welcome; I seldom go this far in depth with my art if I am not talking one-on-one to someone, so I could have missed something.
Hopefully you're not bored to tears! Go make something meaningful and beautiful!

(Materials used: antique paper, gessoed and stamped, acrylic paint, fluid acrylics, commercial stamps, Golden mediums, computer generated prints, wood, stone, shells, wax candle, nails, metal)

Sunday, March 8, 2009

Why doesn't this LOOK like the amount of work that is involved???

Sometimes, you spend copious amounts of time on something and when the pieces are laid out, it looks simple. I mean, as in, should NOT have taken the time that it did. That was how I felt when I got the letters for the Easter banners painted today---it doesn't look like the amount of hours I put in. They just look pretty and easy.

DANG.

For instance, on the close up, you can see the texture. Let me walk you through this:

Gesso, then gesso again because of brush marks.

Trace letters on.

Mix heavy gel medium with paint and carefully go around every letter, filling the background without getting into the letter area.

Paint letters gold.

Mix glaze for background, paint like mad before glaze dries. Then redo part of the letters because the glaze didn't go on even.

Repaint gold letter because the paint sunk into the gesso.

Take light gold glaze and scrub into background of every piece with a rag, to damp down the color, bring back up some of the white paint/medium mix and leave a very slight residual bit of gold.

Hit self in head with hammer.

These are all on pieces of linen canvas about 18" square (more or less) and then will be hand stitched to the banner fabric because you can't cram them through the machine. Yes, it is heavy enough to handle it but the paint will crack and trying to deal with a 3 1/2 yard long silk quilted *worm* to freemotion....oh no way. I may have bad mental days but overall, they're not THAT bad.

So this is what has kept me busy between cooking, laundry, groceries, knitting, blogging, meetings, no real art............oy. Double oy. Because, this is just the beginning of these!

And I forgot to mention the Circus banners start Monday........

Thursday, February 26, 2009

DONE!!! My creativity, in living color!!!

Okay, in an effort to behave better, I have deleted my earlier rant (which disappointed Tristan anyway....sigh....it didn't live up to some of my previous ones....) and got it together getting the pics cropped.
I am very pleased with the back of this piece---it is just what I want, which doesn't happen too often! I did not adjust color, so the bottom is a bit dark, but I think you get a feel for what is going on.
A close up of the top---the color of the shell seemed perfect for the blues used in the piece and also the Abita beer bottle caps with the butterfly images. How I love E-6000....it could glue the planet back together!
And then a sort-of-three-quarter of the front and top. Now I need a name for it that fits with the rest of the "Duality" series. Names are for the most part difficult. They either instantly appear or think and think and nothing happens. The second is much more common!
An aside---the class I want to do will show how to build up the base and color for these pieces. I usually do several canvasses at once to save time. I need to photograph before and after pics of them. The deep ones are what I use due to the space provided on the back. Dick Blick and Cheap Joe's (both the least expensive kind) work wonderful. The only thing I am very specific about is gesso and that is Demco, which can be ordered from Hobby Lobby. If you do anything that uses gesso, I highly recommend trying it.
I know I had promised to explain some things and I need to look back through comments or e-mails to see *what* it was I was going to explain......yikes.....
I guess that will be tomorrows post.
Sorry for being such a lame brain; old age is definitely taking a toll! ;)

Saturday, February 21, 2009

WIP---or---How I Spent Yesterday

Okay, Party-grrrrl gave in to the overwhelming urge to make art yesterday. This picture was at the mid day point; I put some pieces on with gel medium and it required laying flat until dry, so there is more coming with this.
There is so much texture on this it doesn't show up well in photos (please click for a larger image); grit and gesso built up in layers, then fluid acrylics laid on in washes and wiped off. It has a nice feel. At present, with the work done after the photo, I am loving it more. The fleur de lys have color added, there is shading, more blue-green washes, etc. I'll post another photo tomorrow because by then it should be dry enough to prop up and not worry about something taking off for parts unknown.
It felt so GOOD to say to heck with everything yesterday and make art! Yes, work is piled up around me and there was some real paperwork I had to do but one trip to the wet studio and, WHAMMO! That was it. I succumbed with no fight.
And the day flew. Before I knew it, it was time to trot to the kitchen and do the domestic goddess thing.
I really need a twin that can slave away while I indulge in the passion of art. That would work out so much better! ;)

Monday, February 16, 2009

Art for the jurying

This is one of the small box canvas pieces I am taking for consideration in the Nine County Art Show. I have grown fond of these because there is so much that can be done with a relatively small amount of space. They are painting and sculpture all at once; traditional and mixed media---quirkiness and elegance. I enjoy letting the canvas decide what it wants to be. This particular one speaks of the Duality of New Orleans--the front, the lush verdant plants and architecture of the French Quarter and the back, the reality of the Bayou---beauty in the constant change of the landscape. The waters, the trees, the life and death, the low water times when things surface.
Of course, the connection between both sides is the constant growth of plant life and the constant decomposition of anything man made in the
unforgiving heat and humidity of Louisiana. It is a tough, strong bunch, animal, vegetable or mineral,that survives in the swamps. And indeed, New Orleans sits atop a swamp, with fine grit everywhere--silt from the Mississippi River. There is constant change; the landscape is in flux.
I wanted to evoke a feeling of age, discovery, and being tied to the earth.
I tried several times to get a good photo of the back-side box contents and it just would NOT cooperate. So you get a 3/4 view.
Yep, there is a broken bone and a shell in the back, some wire, small pebbles, etc. Things that could be found along the edge of the bayou.
I would love to inspire others to try this process--the worst part is preparing the canvas. Actually, I have some more to prime, so maybe that will be a tutorial.
Maybe.
Maybeeeee.............. ;) If someone asks nicely.
At any rate, this is about 4" x 6", so you can see that there is a lot that you can pack visually into a small package. Please click on the photos to see them up close.
And if I can get a decent pic on the inside, I'll post that too. Don't hold your breath on that on. Unless you like looking blue!


P.S. Okay, this is not great but gives an idea of the inside of the back cavity....

Sunday, February 1, 2009

More on sketch books....

.....one of the things I do to all the pages in my book is cover them with Demco Artists Grade gesso. It bulks up the page and gives a good ground for many mediums. In fact, I have been surprised at how differently things react on the gessoed paper. I have come to love it.
On days I don't feel *artistic*, I coat pages. It is meditative and lets me think I am accomplishing something of value! This is a combination of pencil, craft acrylic and quilters template marking pencil on the gesso ground. There is probably some fluid acrylic in there too, can't remember. The ground lets you push paint around, the pencil almost becomes water-soluble and if you choose to use a rough brush, you have extra texture also.
The painting is from a photo I took in New Orleans, a typical house in the French Quarter; the little balconies rich and verdant with foliage and flowering plants. Ferns grow out of every crack and crevice that can hold a bit of the silty soil always blowing in the air from the Mississippi. It is a cramped part of the city rich with varied life. Yet two stories up, everything is different. Gardens in the air. Most enchanting.
The owners water every morning, and there is something delightful about walking under the wrought iron canopies in the already devilishly hot sun, feeling a few cool drops of water falling upon you.
That was what I felt working on this---that languid, time-standing-still sense of the city that I so love.

Saturday, January 31, 2009

Sketch books

I am a sucker for odd shaped sketch books. The regular shaped ones have no appeal to me, so I end up buying books that pile up and don't get used. My favorites are small ones---non-threatening sizes that I can have fun with.
I had ordered one from Dick Blick with a plain chipboard cover (very heavy stock). It is about 6" square and I immediately gessoed the covers. I like to work with my fluid acrylics on a gesso base. This was what happened:
(front cover) (back cover)
This was just playing around with the fluid acrylics; laying them on in washes, wiping some off, continuing the process until I had a base that I was happy with. Then I added some Prismacolor pencil, Sharpie marker, got out the stamps and ink and embossing powders. I was just having FUN, which for me, that is what a sketch book should be.
I remember in high school I hated keeping a sketch book. I got great grades in art, but the sketch book part was my weak area. My attitude was, "Why should I do something TWICE???"
Usually my sketches consist of a thumbnail that would be undecipherable by normal human eyes. A scribble at most. So when I started this book (and there is not a lot in it yet) it was to allow me to play with colors, textures, and mostly the theme of New Orleans and the flooding, which I have held in my heart since Katrina hit.
My art comes from a deep well filled by our trips to NOLA. And I had put a lid on it after the disaster, because I hurt so deeply from it I could not process it. Anger, tears, disbelief, deep anguish.
So this little flippant project began a healing process that is letting the art out again.
I'll share more of the contents in the coming days and explain what I've used and how it works.
Now, back to the banners! Worked on them till 9 last night and ready to hand stitch miles today!
I need my FiberPirates here to help........get in your dinghys and row fast! I ORDER YOU!!!